


Introduction:
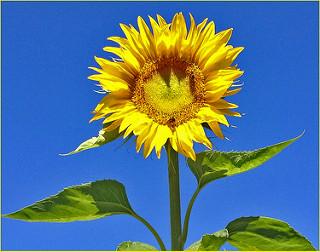
In this article, we will learn about the processing that happens to an image before it is fed into CNN, using rose and sunflower images as our example.
Here is the full pipeline we will cover:
Image → Pixels → Tensor → Preprocessing → Dataset → DataLoader → Batch → CNN
What Does CNN Actually See?
CNN does not visualize images the way humans do. It only sees standardized pixel values arranged in batches.
How an Image Becomes Numbers
An image is simply grid-structured data made up for rows and columns. The images we store on our computers are in compressed, encoded formats like .jpeg or .png. To use them in code, we decode them using libraries like OpenCV or PIL.
This extracts the raw pixel values, where each number from 0 to 255 represents the brightness intensity at what exact spot (where 0 is completely black and 255 is completely white.)
RGB vs Grayscale Images
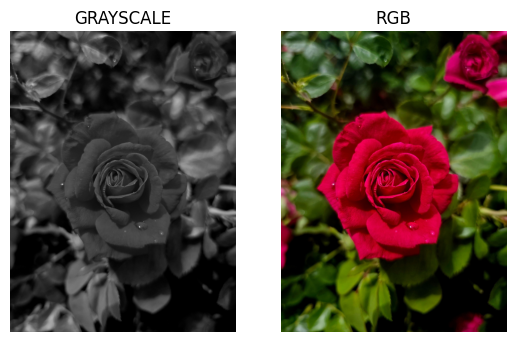
RGB stands for Red , Green, and Blue. Computers represent colors using the intensity of these three colors. To store each color separately, we use channel, each channel holds the intensity values of one color across the entire image.
A grayscale image has 1 channel, where each pixel value represents brightness in the range 0-255.
An RGB image has 3 channels — one for Red , one for Green , one for Blue each also in the range 0-255.
The shape of an RGB image is (224 x 224 x 3) and a grayscale image is (224 x 224 x 1)
Note: OpenCV represents image as (H x W x C) but PyTorch expects (C x H x W), so we convert the format before feeding into the model.
Why Do We Preprocess Images?
- Reason 1 (Format): PyTorch doesn’t understand .jpeg. It needs tensors. We convert the raw pixel values into a tensor, which is a multi-dimensional math grid, so PyTorch can run backpropagation or matrix multiplication.
- Reason 2 (Scale): values like 204 , 189 , 23 cause unstable gradients during training. Scaling fixes this.
- Reason 3 (Consistency): every image must be the same size and format before entering the model. preprocessing ensures that.
How to Organize the Dataset
Organize your images into folders where each folder name represents the class label.
PyTorch’s ImageFolder automatically reads the folder name as the class label. So the model knows that all the images inside the rose/ folder belong to the class “rose” — you don’t need to manually assign labels.
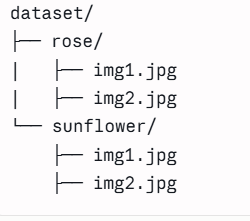
Note: Make sure there are no extra folders inside your class directories (like a hidden/ or backup/ folder) , because ImageFolder will accidentally treat them as a completely new class!
Train, Validation, and Test Sets
We split the dataset into three sets so the model can learn the patterns , be tuned , and be evaluated fairly.
Training set: fed to the model during training only. The model updates its weights through backpropagation to minimize the loss based on what it sees.
Validation set: used to monitor how the model is performing during training. Based on this, we tune the hyperparameters.
Test set: completely unseen data. The model has never seen it during training or tuning. We use it to check how well the model performs in a real, unseen scenario.
What does Unseen mean?
It means the image was not part of training, but it should still belong to a class the model was trained on. For example if you train on a rose and sunflower, and then give it a lotus — it will still predict either rose or sunflower, because it has never learned what a lotus looks like.
There are two important settings I need to tell you about when splitting your dataset: shuffle and seed.
Shuffle: we randomize the order of images so that batches contain less correlated samples, which make optimization more effective.
Seed: we set a seed so that every time we run the code, we get the same split. This makes results reproducible for you and anyone else running the experiment.
Data augmentation
Augmentation is a technique applied to images to create variations of the same image. It reduces overfitting and is useful when working with a small dataset.
We apply augmentation after splitting, not before; otherwise, the same image (just augmented) could leak into both train and test sets, causing data leakage.
Does it increase disk size?
No, augmentation happens on the fly. Each image gets a fresh random transform every time it’s loaded, so the same image looks different across epochs, without ever creating or storing new image files on disk.
Common augmentations: rotation, resize, flip, brightness, contrast, noise.
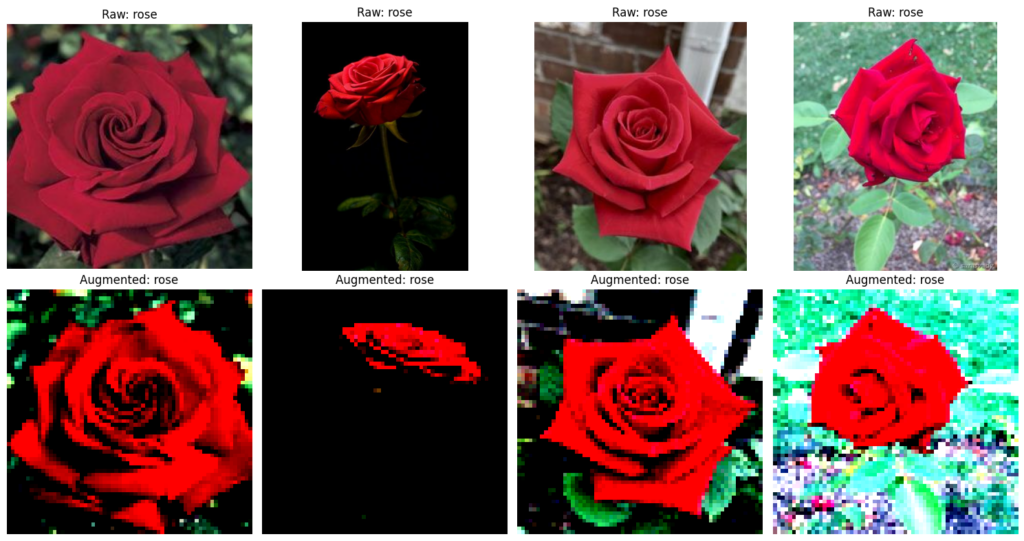
But don’t apply blindly; check if it makes sense for your task. Example: flipping a car image can be risky if left vs right orientation actually matters for your labels. For something like Rose/sunflower classification, brightness, contrast, and noise variation genuinely help the model generalize better.
Scaling and Normalization
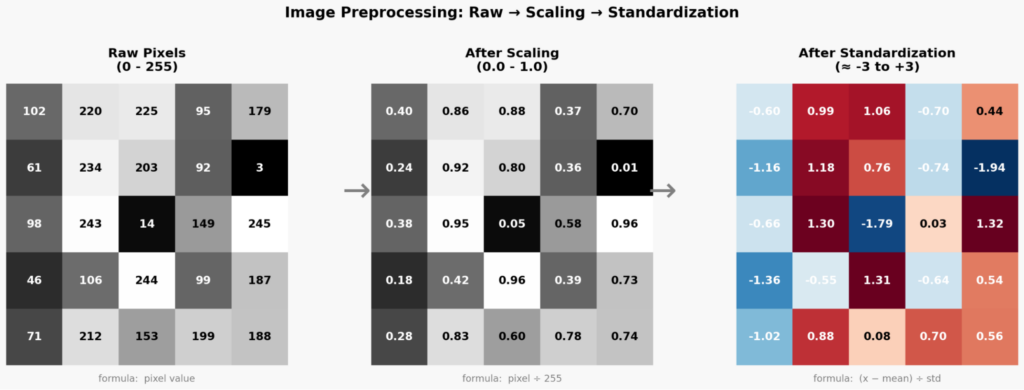
Raw pixel values range from 0-255. Large values like 130 or 234 cause unstable gradients during training. So we scale them down first.
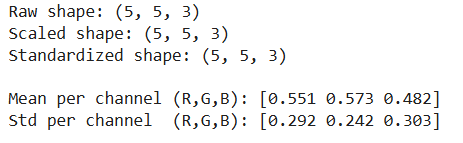
In the image above you can see the raw pixel values. The shape of this image is (5 , 5 , 3 ) . 5 rows , 5 columns, and 3 channels (RGB).
As an example, let us take the pixel value 102 and scale it.
Scaling formula:
scale_pixel = pixel / 255
Example: 102 → 102/255 = 0.40
This brings all values to 0-1.ToTensor() does this automatically in PyTorch.
Why standardization after scaling?
Scaling brings value to 0-1 but they are still not centered. Standardization fixes this.
Formula of Standardization:
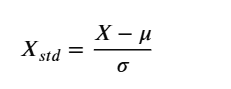


Taking our scaled value 0.40, with mean of R channel = 0.551 and std = 0.292:
X_stand = (0.40 – 0.551)/0.292 = -0.151/0.292 = -0.517
We calculate mean and std separately for each channel – R , G , B — from the training set only. So you end up with 3 mean values and 3 std values total.
Why mean and std?
- Mean shifts the data so it centers around 0
- Std scales the data so it’s not too wide or too narrow
This helps the model train faster and more stably.
Note:
Augmentation is applied to the training set only.
For validation and test sets we apply only resizing and scaling, no augmentation.
The mean and std for standardization are calculated from the training set only, and then reused for validation and test sets.
If we calculate them separately for each set, the model indirectly get information about unseen data before making predictions this causes data leaking
PyTorch Dataset
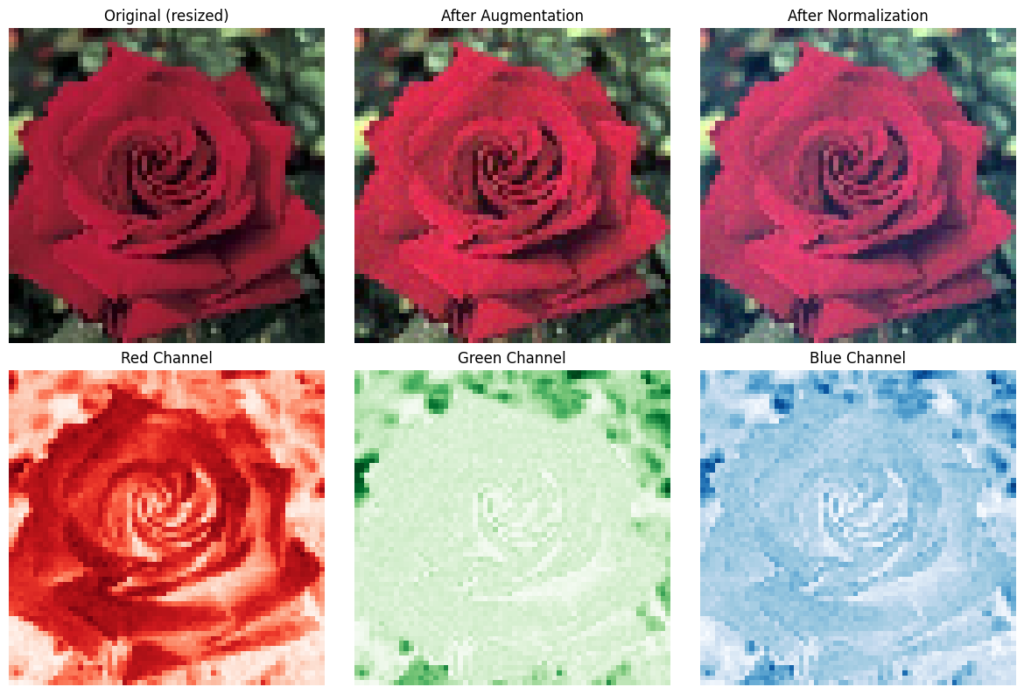
Each image must be paired with the correct label so the model knows which class it belongs to. The label identifies the class of the entire image for example “rose” or “sunflower”. The CNN then learns visual patterns from the pixels that help it distinguish between those classes.
This is where the Dataset comes in — and here “Dataset” does not mean the folder of images you collected. It means a Python class that does the three things:
- Loads the image
- Applies the augmentation
- Pairs it with the correct label
PyTorch gives you two ways to do this:
- ImageFolder: The easiest option. Since we already organized images into class folders, ImageFolder reads the folder name as the label automatically. No custom code needed.
- Custom Dataset class: you write your own class with three methods: __init__, __len__, and __getitem__. Used when your data structure is more complex.
DataLoader and Batch
In the DataLoader, we group everything into batches. Why? Because feeding 1M images all at once would crash the system, and feeding them 1 by 1 would be too slow. So, the batch is the middle person.
For example, if we take batch_size=4, that means the batch contains 4 images with their labels.
The shape of one batch looks like this:
[4 , 3 , 224 , 224]
where:
- 4 = batch size
- 3 = RGB channels
- 224 = image height
- 224 = image width
The DataLoader also shuffles the training data each epoch so the model sees images in a different order every time. Same benefit as shuffling during splitting.
What Finally Enters CNN?
After all the preprocessing steps, what finally enters the CNN — batch of standardized tensors with the shape:
[batch_size , channels , height , width]
For example:[4 , 3 , 224 , 224]
Each value inside is a small standardized number, usually between -3 and +3. The CNN then learns the patterns from these numbers — edges, textures , shapes to distinguish between classes like rose and sunflower.
What Happens Inside CNN?
Now that the batch of standardized tensors has entered the CNN , the real learning begins: convolution , feature maps, pooling, and more. You will understand this when you learn about CNN in detail.
Key Takeaways
- A CNN does not see images the way humans do, only sees standardized numbers in tensor format.
- An image is decoded into raw pixels using OpenCV or PIL , then converted into a tensor using ToTensor().
- The dataset is split into three sets: training , validation and test; each set serves a different purpose.
- Augmentation is applied to the training set only, on the fly , without increasing disk size.
- Scaling brings pixel values from 0-255 to 0-1. Standardization centers them around 0 using mean and std from the training set only.
- The Dataset class pairs each image with its correct label.ImageFolder handles this automatically for folder-based dataset.
- The DataLoader groups images into batches with shape [batch_size , channels, height , width].
- What finally enters the CNN is a batch of clean, standardized tensors not raw images.
FAQ
Q: Why the pixel value in the range of 0-255?
A: Standard digital images allocate 8 bits(1 byte) of memory per pixel channel, which allows for (256) unique integer values ranging from 0 (pure black) to 255 (pure white).
Q: Why shouldn’t we apply data augmentation (like rotation , flipping , or noise) to validation and test sets?
A: Because these sets need to show how the model performs on real-world data. Applying augmentation gives us overoptimistic results.

Pooja Vachhad is a self-taught Computer Vision engineer with 3 years of hands-on experience in YOLO, PyTorch, OpenCV , based in Noida, India.