

You need an illustration for a short article about cooking at home. You know what you want the reader to feel, but your image folder contains nothing close. Instead of studying every possible image model, make this one article your first project. GPT Image 2 provides text-to-image creation and an image-to-image option for working from an existing picture. The goal of this guide is not to master a complicated interface in one sitting. It is to finish a relevant, usable image and understand why each decision helped.
- Write the Assignment Before Writing the Prompt
- Build the First Request From Three Decisions
- 1. Who or What Is the Focal Point?
- 2. What Does the Setting Contribute?
- 3. Where Will the Image Be Placed?
- Try That Brief on the GPT Image 2 Website
- The First Result Is a Conversation About Specific Details
- Place the Picture in the Article Before Calling It Finished
- Make Your Second Project Deliberately Different
- Conclusion
Write the Assignment Before Writing the Prompt
The article is about preparing a quick weekday meal, and its header needs a warm, ordinary kitchen scene. That sentence is already a useful brief because it identifies the subject, tone, and destination. Now decide what the reader should notice first: perhaps a home cook chopping vegetables at a counter.
Add one practical constraint. The header will have a headline on the left, so the action should sit toward the right. Do not add exact recipe steps to the prompt; the article should supply those. You are creating an illustration of the topic, not a visual instruction manual that readers must follow without text.
A first project is easier when the success test is clear: someone seeing the image should understand that the article is about everyday cooking, and the editor should have space for the title. That is enough direction to begin.
Build the First Request From Three Decisions
1. Who or What Is the Focal Point?
“A home cook chopping vegetables” gives the image an action. “A beautiful food scene” does not. The focal point should be recognizable when the image is reduced to its actual header size. If the cook is only a tiny figure in a huge kitchen, the brief has failed even if the room looks appealing.
For other projects, the focal point might be a product, a book, a single object, or a simple event. Start there rather than adding scenery first.
2. What Does the Setting Contribute?
Ask for a compact kitchen, a wooden board, and soft daylight from a nearby window. These details support the story without filling the frame with irrelevant appliances, decorations, or dramatic effects. The atmosphere should feel like someone preparing an ordinary meal after work.
The setting does not have to describe every wall. If the reader can understand the place and the action, you have enough information to test the first draft.
3. Where Will the Image Be Placed?
Finish with “wide horizontal composition, subject on the right, quiet space on the left.” This is not an artistic flourish; it is the practical instruction that makes the picture fit the article. Choose a suitable aspect ratio when creating the image.
A square social post or vertical story would need different framing even if its subject stayed identical. The destination belongs in the brief before the image exists.
Try That Brief on the GPT Image 2 Website
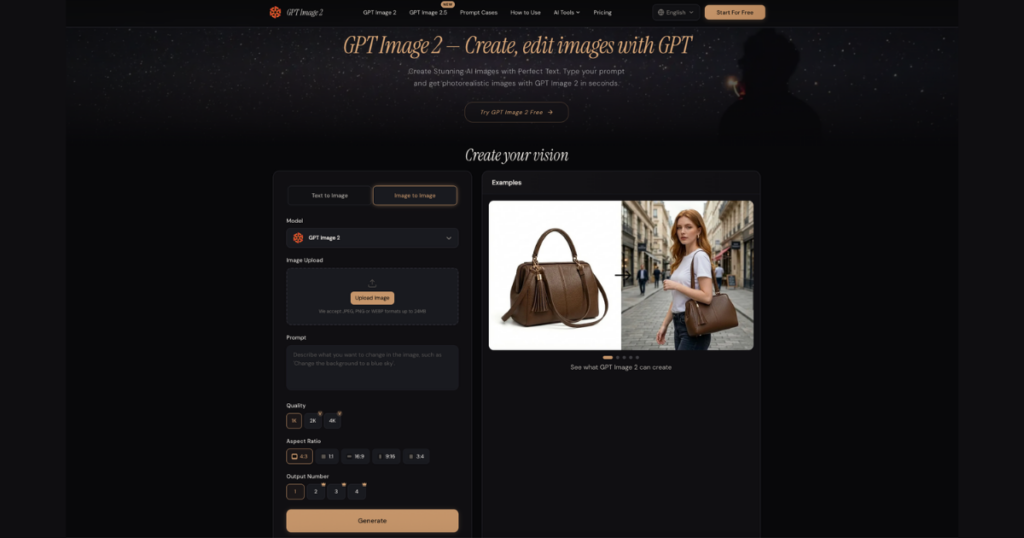
Open the creation interface and choose Text to Image. Enter one prompt that joins the decisions above: “A home cook chopping vegetables at a wooden counter in a compact kitchen, soft daylight from a side window, natural editorial photography, wide horizontal composition, cook on the right, uncluttered wall on the left, no text.”
Choose the aspect ratio that matches your intended header. The site also displays quality and output-number settings; select the options relevant to your project without treating every setting as a requirement to learn immediately. Generate and inspect the results against the assignment, not against an imaginary perfect image.
Do not assume that selecting several outputs will solve a vague prompt. If every option puts the cook in the center, the framing instruction needs attention. If the scene looks like a commercial studio instead of an ordinary kitchen, simplify the style and setting language. One meaningful revision teaches more than cycling through unrelated prompts.
The First Result Is a Conversation About Specific Details
Imagine the image gets the person and kitchen right, but plants and framed signs fill the left wall. It is tempting to replace the entire prompt. That risks losing a subject and camera angle you already like. A better question is whether you need a fresh generation or a targeted edit.
Keep the Parts That Fulfill the Brief
Write down what is working: the cooking action, the natural daylight, the camera distance, and the warm kitchen materials. A useful correction names these elements so the next version has a clear reference point. Keep the original image available, rather than relying on your memory of it.
Change Only What Blocks Publication
If the left wall is the sole problem, upload the image in Image to Image and ask: “Keep the cook, counter, vegetables, viewpoint, and lighting. Remove the signs and plants from the left wall, continuing its plain surface naturally.” GPT Image 2 supports that upload-and-prompt editing route. Review the repaired area and the preserved subject; a convincing overall look does not prove every detail stayed correct.
If the entire scene misses the article topic, however, return to Text to Image and rewrite the basic assignment. Editing cannot rescue a concept that was never suitable.
Place the Picture in the Article Before Calling It Finished
The image may look excellent inside a large preview but fail beneath the site’s navigation or behind the headline. Insert it into the actual draft. View it on a narrow screen and check whether the cook is still easy to see. Look at hands, utensils, repeated objects, and any accidental text in the background.
If you need a precise headline, add it with a publishing or design tool where spelling and placement are easy to control. The illustration supports the article; it does not need to carry every detail inside its pixels. Save the strongest prompt, the original result, and any edited version with names that explain their purpose.
This final placement check teaches another beginner skill: an image is not successful simply because it looks polished. It succeeds when it works where people will encounter it. A visual meant for a cooking article should not require the reader to stop and decode an elaborate imaginary kitchen.
Make Your Second Project Deliberately Different
Once the article is finished, try a square image for a social post about the same subject. Do not just crop the wide header and hope. Write a new placement requirement: one central focal point, fewer small props, no required headline space. Then try one edit to an original photograph you are permitted to modify, such as removing a distracting bag while leaving a tabletop and its contents unchanged.
These two exercises teach different skills. The square illustration teaches composition from a brief; the photo edit teaches preservation. You will also learn which decisions should remain stable across formats and which are specific to one placement. Keep the process small enough that you can compare the result with your intention after every attempt.
Conclusion
Your first useful AI image does not need an elaborate prompt or an impressive demo scene. It needs a purpose, a focal point, a setting that supports the idea, and framing that fits the final page. Generate the first draft, inspect what missed the brief, and switch to an uploaded-image edit when the picture is already mostly right. Complete the article before judging the exercise. Then repeat the process with a different format so you learn how the same idea changes when its destination changes. One finished image is a stronger starting point than dozens of disconnected experiments.

Sandeep Kumar is the Founder & CEO of Aitude, a leading AI tools, research, and tutorial platform dedicated to empowering learners, researchers, and innovators. Under his leadership, Aitude has become a go-to resource for those seeking the latest in artificial intelligence, machine learning, computer vision, and development strategies.