

Losing files from an external hard drive can feel worse than losing files from a regular PC folder. In many cases, external drives store backups, project archives, photos, video footage, work documents, or years of personal records. When those files disappear because of accidental deletion, formatting, file system issues, or an interrupted transfer, most people immediately assume the data is gone forever. Fortunately, that is not always true.
- Why Deleted Files from an External Hard Drive May Still Be Recoverable
- Common Reasons Files Disappear from an External Hard Drive
- What to Do Immediately After Losing Files
- Step-by-Step Guide: External Hard Drive Recovery on Windows
- Step 1: Connect the External Hard Drive and Select the Correct Device
- Step 2: Scan the Drive for Deleted and Lost Files
- Step 3: Preview Recoverable Files and Save Them to a Different Location
- What If the External Hard Drive Is Corrupted or Asks to Be Formatted?
- Additional Troubleshooting Tips for Windows Users
- Mistakes That Can Reduce Recovery Chances
- Who This Recovery Workflow Is Best For
- Final Thoughts
If you need External Hard Drive Recovery on a Windows computer, the most important thing is to act carefully and avoid making the situation worse. Deleted files often remain recoverable until new data overwrites the same storage space. That is why the first response matters so much. The right workflow can help you recover deleted files from an external HDD or SSD without increasing the risk of permanent loss.
In this guide, we will walk through what really happens after deletion, what to do immediately, and how to use a practical recovery workflow on Windows. If you want a dedicated software-based solution, Recoverit is one option many users consider when they need to scan an external drive, preview recoverable files, and restore them to a safe location.
Why Deleted Files from an External Hard Drive May Still Be Recoverable
When a file is deleted from an external hard drive, Windows usually does not erase the content byte by byte right away. Instead, the system marks the storage space as available for reuse. Until new files are written to that same part of the drive, the original data may still exist in the background. This is why many deleted files can still be found with recovery software.
However, recoverability depends on several factors:
- How long ago the file was deleted
- Whether the drive has been used after deletion
- Whether the drive is physically healthy
- Whether the loss was caused by deletion, formatting, corruption, or partition issues
- Whether TRIM or other storage management processes affected the deleted data
That is why no responsible recovery guide should guarantee results in every scenario. Still, for logical data loss on a readable external drive, a structured Windows recovery process often gives users a reasonable chance to retrieve documents, photos, videos, archives, and other file types.
Common Reasons Files Disappear from an External Hard Drive
External hard drive data loss is not limited to simple deletion. The same recovery workflow is often used in a range of Windows-based scenarios:
- Accidentally deleting files or folders
- Emptying the Recycle Bin after moving items from the drive
- Formatting the external hard drive by mistake
- Disconnecting the drive during a transfer
- Power failure while writing data
- File system corruption caused by unsafe ejection
- Virus or malware activity
- Drive shows RAW, inaccessible, or asks to be formatted
For Recoverit, this topic is valuable because it sits close to high-intent user demand. People searching this keyword are usually not browsing casually. They often already have data loss on hand and need an actionable fix on Windows. Compared with broad “data recovery software” terms, this kind of keyword is more scenario-driven and easier to match with real user pain points.
What to Do Immediately After Losing Files
Before you start recovery, stop and avoid the most common mistakes. These simple actions can preserve your chances of success:
- Stop using the external drive immediately. Do not copy new files to it, move folders around, or keep editing content stored there.
- Do not format the drive even if Windows prompts you.
- Do not run random repair utilities first unless you understand the risk. Some fixes can alter directory structures.
- Do not save recovered files back to the same external drive. Use another disk or your internal drive.
- Check physical basics first. Try another USB port, cable, or computer if the drive is not showing up correctly.
Important: If your external drive is clicking, overheating, disappearing repeatedly, or failing to spin properly, the issue may be physical rather than logical. In those cases, software recovery attempts should be approached carefully, and professional lab help may be safer for critical data.
Step-by-Step Guide: External Hard Drive Recovery on Windows
The following workflow is suitable for many everyday Windows recovery scenarios, especially accidental deletion, missing files, and accessible but problematic external drives. If you want a guided scanning and restore process, a Windows Data Recovery tool can help automate file discovery and preview.
Step 1: Connect the External Hard Drive and Select the Correct Device
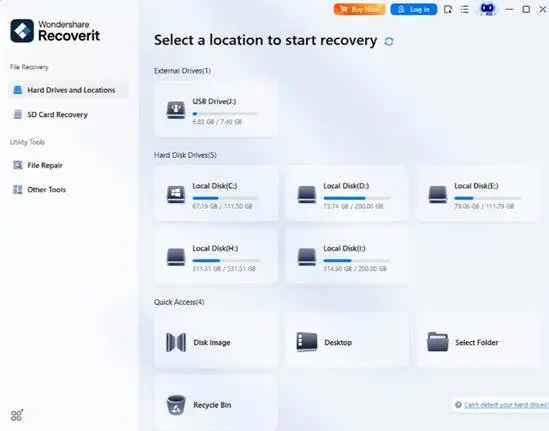
Connect the external hard drive to your Windows computer and make sure the system detects it. Open your recovery tool and look for the drive under available storage devices. Before scanning, double-check that you are choosing the correct external disk, especially if you have multiple partitions or USB devices connected.
This step matters because recovery quality often starts with choosing the exact source location where the files were lost. If the deleted data came from an external HDD, selecting the correct volume reduces confusion and keeps the recovery process focused.
If the external drive does not appear at all, first test another USB port, cable, or machine. If it appears in Disk Management but not File Explorer, the issue may still be logical and recoverable. If it does not appear anywhere, hardware failure becomes more likely.
Step 2: Scan the Drive for Deleted and Lost Files
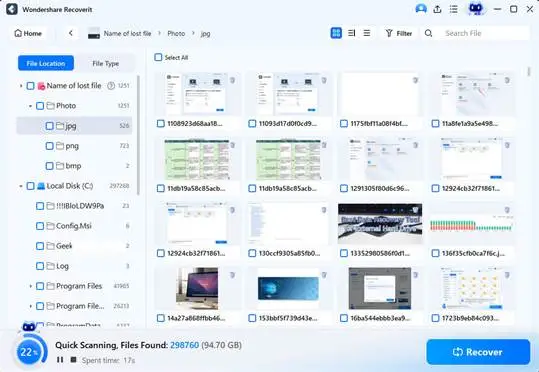
Once the external drive is selected, start the scan. Most modern recovery tools perform a fast search first and continue with a deeper scan to locate more deleted, hidden, or structurally damaged file entries. During the scan, you may see files appear in real time.
For users specifically dealing with external HDD loss, a targeted External Hard Drive Recovery workflow is useful because it focuses on removable storage scenarios such as accidental deletion, corruption, and reconnect-related file loss.
Be patient during this stage, especially on large drives. The scan can take longer if the disk has a high capacity, many small files, or some file system inconsistency. Stopping too early may mean missing deeper results. On the other hand, if the files you need appear clearly and can be previewed, some tools allow you to recover them without waiting for every sector to finish scanning.
Step 3: Preview Recoverable Files and Save Them to a Different Location
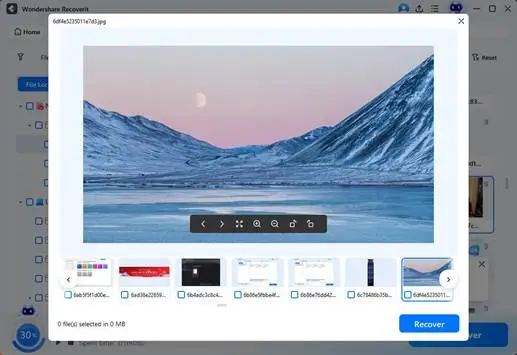
After the scan, filter results by file type, date, or path if that helps narrow things down. Preview the files whenever possible. Previewing is useful because it helps verify whether a file is actually intact before recovery. Once you find what you need, recover the files to a different drive, not back to the original external hard disk.
Saving recovered data to another location is essential. Writing files back to the same external drive can overwrite yet-unrecovered items and reduce your remaining recovery chances. After the files are safely restored elsewhere, you can inspect the external drive further or decide whether it needs reformatting, replacement, or a health check.
What If the External Hard Drive Is Corrupted or Asks to Be Formatted?
This is one of the most common and stressful situations on Windows. You plug in an external drive and get a message saying the disk needs to be formatted before use. In many cases, formatting the drive immediately is the worst first move, because it can complicate data recovery.
Instead, try this order of action:
- Cancel the format prompt.
- Check whether the drive appears in Disk Management.
- Use recovery software to scan the drive first.
- Recover important files to another storage device.
- Only after recovery, consider file system repair or reformatting.
This scenario is especially relevant for Recoverit because it bridges user intent across deletion, corruption, and inaccessible drive recovery. It also creates content differentiation versus competitors like Disk Drill, EaseUS, and Stellar when the article focuses on practical Windows response steps instead of generic software promotion alone. The real differentiator is not making unsupported claims, but being more specific about user decision flow, risk control, and storage behavior after data loss.
Additional Troubleshooting Tips for Windows Users
If the basic recovery flow does not fully solve the problem, these checks can help:
- Check Device Manager: If the drive appears there, Windows may still be communicating with the hardware.
- Open Disk Management: See whether the disk is listed as online, RAW, unallocated, or without a drive letter.
- Assign a drive letter: Sometimes the drive is healthy but simply not mounted with a visible letter.
- Try a different enclosure or adapter: For portable drives, the interface accessory can fail even when the disk is still readable.
- Watch for physical warning signs: Clicking sounds, repeated disconnects, or extremely slow detection may point to hardware trouble.
If your drive has physical symptoms, avoid repeated scan attempts if the data is highly valuable. Each additional read attempt can add stress to a failing device. For mission-critical business or irreplaceable personal files, professional recovery evaluation may be the safer path.
Mistakes That Can Reduce Recovery Chances
Users often lose recoverable data not because recovery software failed, but because they took the wrong action first. Here are the biggest mistakes to avoid:
- Installing software onto the affected external drive
- Continuing to use the drive after deletion
- Recovering files back to the same drive
- Formatting before attempting recovery
- Running multiple aggressive disk fixes without understanding the risk
- Ignoring signs of possible hardware damage
For content creators, office teams, students, and small businesses, these mistakes are common because the first instinct is usually to “try everything.” A better content angle for external link growth is to teach users what not to do first. That gives the article practical value and increases trust.
Who This Recovery Workflow Is Best For
This Windows-oriented recovery guide is especially relevant for:
- Users who accidentally deleted files from an external hard drive
- People who emptied folders and cannot find them again
- Creators who store raw media, photos, or project assets on portable storage
- Office users who lost Excel, Word, PDF, or archive files
- Small business teams managing backups or shared transfer drives
- Anyone dealing with a readable but problematic external HDD on Windows
From a SEO and conversion perspective, that makes this keyword especially useful for Recoverit. It connects directly to high-intent scenarios across Windows recovery, hard drive recovery, external device recovery, and accidental deletion. It also naturally supports related content clusters such as corrupted external drive repair, RAW drive recovery, deleted folder recovery, and formatted hard drive recovery.
Final Thoughts
External hard drive file loss on Windows is stressful, but it does not always mean the data is permanently gone. In many deletion and logical corruption cases, the most effective response is surprisingly simple: stop using the drive, scan it carefully, preview what is recoverable, and restore those files to a different location.
If you need a software-based workflow, Recoverit provides a Windows-oriented path that fits this exact scenario: selecting the affected drive, scanning for deleted and lost data, previewing results, and recovering files safely. That makes it a practical destination for users searching for external hard drive recovery guidance rather than a generic software list.
For Recoverit as a business, topics like this have clear value because they align with urgent user intent, support scenario-based landing pages, and create stronger topical relevance than broad recovery terms alone. For content planning, this article format is best suited to Windows deletion recovery, external hard drive issues, and adjacent storage-loss education. Compared with major competitors, the clearest opportunity is to win with more scenario-specific, answer-first, caution-aware content rather than unsupported performance claims.

Sandeep Kumar is the Founder & CEO of Aitude, a leading AI tools, research, and tutorial platform dedicated to empowering learners, researchers, and innovators. Under his leadership, Aitude has become a go-to resource for those seeking the latest in artificial intelligence, machine learning, computer vision, and development strategies.